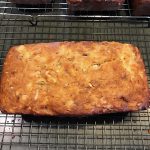
Oven Baked French Toast with Berries
This is another recipe adapted from the child care menu planning resource the state of Delaware put together.
Originally called “Strawberry Jumpin’ French Toast” it calls for strawberries, but I didn’t have any on hand so I used blueberries instead. I’ve made it with strawberries also, and both versions are delicious! What amazes me most about this recipe is how sweet it is, even though you don’t add any sugar or honey to the French Toast or fruit topping.
Oven Baked French Toast with Berries – Recipe in Pictures
As usual, I didn’t follow the recipe exactly. I don’t color in the lines either, and I’ve been known to run with scissors too. I’ve included the official recipe at the end, but here’s my version:
Cube the bread and place in the bottom of a lightly greased 9×9″ pan. Mine came from my grandma and is obviously well-loved.
Whisk together 2 whole eggs, 1 cup milk, and 1 tablespoon melted butter. Pour over bread cubes. Gently toss to make sure all cubes are moistened.
Place in oven and bake at 350° F for about 20 minutes, or until the center isn’t gooshy.
While the bread mixture is baking, place frozen blueberries or strawberries in a saucepan to thaw and warm.
Cut the baked French Toast into equal pieces and top with 1/2 cup berries.
“What do you think, Peanut?”
She likes it! Hey Mikey! I mean Hey Peanut! Remember that Life cereal commercial?
I haven’t tried it yet, but I’ll bet just about any fruit would be delish on top of this baked French Toast. If you try another fruit be sure to tell me what you think!
Oven Baked French Toast with Berries – Official Recipe
This recipe is written for seven child-sized servings, but you can easily double the recipe by doubling the ingredients. Using the amounts below I served four children “seconds” and they gobbled it up!
Ingredients for Oven Baked French Toast with Berries
- 7 slices whole wheat bread
- 2 egg whites
- 1 cup low-fat or nonfat milk
- 1 tablespoon margarine, melted
- 4 cups plain strawberries
- Optional cottage cheese or yogurt
Directions to Make Oven Baked French Toast with Berries
- Cube the bread and arrange on the bottom of a lightly greased 9×13″ pan.
- Whisk together the egg whites, milk, and margarine. Pour mixture evenly over bread cubes.
- Cover with foil and refrigerate overnight.
- Preheat oven to 350° F. Bake covered for 30 minutes.
- Thaw strawberries and warm in saucepan.
- Cut casserole into even servings.
- Top each serving with 1/2 cup strawberries. Top with cottage cheese or yogurt, if desired.
Oven Baked French Toast Nutrition Facts
According to the original recipe, if made using the ingredients above, 1 serving will 1/7 of the whole pan, and will contain 135 calories (30 from fat), 3g total fat, 3g fiber, and 7g sugar. Making it a la Amy Sue will change the nutrition information, but will be just as tasty!
Happy healthy baking!… and eating!

Apple Bread Pudding Recipe
Last spring my friend Dorothy aka my partner in coffee introduced me to a fantastic child care menu planning resource from the state of Delaware. It’s full of nutritious, whole grain, low fat recipes that I fell in love with right away. I vowed to try all of the recipes at least once even the really weird ones, then keep the good ones and change the not-so-good ones to make them better.
This recipe didn’t need any tweaking to make it yummy; the kiddos gobbled it up the first time we tried it. It’s officially called “Sandbox Surprise” but is basically a variation of apple bread pudding. Although I gag on most bread puddings too gooshy! this one has a moist yet firm texture that I actually like. I hope you and your kiddos like it too!
Apple Bread Pudding Recipe – in Pictures
This is a fantastic recipe for children to help with; there’s something they can do at every step .
Toast some whole wheat or whole grain bread and cut it into cubes. Toss the cubes in the bottom of a greased bread loaf pan.
Peel, core and dice up your favorite baking apples.
My fave is Cortland – for both cooking and eating – but McIntosh would work too. I wouldn’t use Granny Smith because this bread pudding gets its sweetness from the apples instead of added sugar, so you want a sweeter apple.
Mix a couple of eggs with some milk, unsweetened applesauce, vanilla and cinnamon.
The recipe calls for whole eggs plus egg whites, but I usually use the whole egg because I don’t like to waste the yolks, and usually in too big a hurry to separate eggs.
Sprinkle the apples on top of the toast cubes.
I thought the top layer of apples ended up a bit dry, so next time I’m going to try mixing the apples in with the toast so there will be apple throughout, not just on top. The original recipe suggests serving the apple bread pudding with raisins, but I think they’d be really good mixed in with the apples. I’ll bet the bread pudding would be good with walnuts or pecans included too, or any other nut or dried fruit you like. Something for us to try next time…
Pour the egg mixture over the apples and toast; be sure all the toast is moistened. Cover and refrigerate.
Bake uncovered until the middle is set.
Cut into squares while warm, and…
Enjoy!
You can serve the bread pudding with yogurt, raisins, etc, but we all liked it just the way it was.
Apple Bread Pudding – Official Recipe
Makes 6 child-sized servings. For more servings, double or triple all ingredients. Use a 8 x 4 loaf pan for up to 12 servings and an 11 x 7 baking dish for 24+ servings.
Apple Bread Pudding Ingredients
- 4 slices whole grain bread, toasted
- 1/2 C natural applesauce
- 2 C apples, peeled, cored and diced
- 2 whole eggs
- 1 1/2 C fat-free or 1% milk
- 2 Tbsp vanilla
- 1 tsp cinnamon
- 1 C raisins (optional)
- Low-fat yogurt (optional)
Apple Bread Pudding Directions
- Preheat oven to 350ºF.
- Spray 8 x 4 loaf pan with cooking spray.
- Place cubed toast in bottom of pan.
- Mix all other ingredients together and pour over toast, being sure to coat all pieces. Cover with plastic wrap.
- Refrigerate for 30 minutes.
- Bake uncovered for 45 minutes to 1 hour and 30 minutes, depending on size of pan and number of servings.
- Cut into even squares. Serve alone or with low-fat yogurt and raisins.
Happy Healthy Eating!

Microwave Caramel Corn Recipe
If you’re scrambling for a last minute gift, this microwave caramel corn is the answer! Not only is it the yummiest caramel corn I’ve ever tasted, making it is SO quick and easy that you can whip some up tonight and gift it tomorrow. I’ve given it to classroom teachers, Sunday School teachers, hair stylists, friends, neighbors, co-workers, etc. But I won’t make it for us because it’s so good I’d eat the whole batch myself.
Microwave Caramel Corn Recipe in Pictures
You’ll need popped popcorn, light Karo syrup, butter the real stuff; not margarine, brown sugar, salt and baking soda.
Divide the popcorn into two microwave safe bowls.
Put the butter, brown sugar, Karo syrup and salt into a microwave safe bowl.
Stir to break up the brown sugar.
Microwave 2 1/2 minutes.
The butter should be melted, but the sugar may not be dissolved.
Stir to combine. Microwave another 30 seconds to bring the mixture to a boil.
If you have any kiddos helping, now’s the time to have them stand back and just watch. The caramel gets wicked hot and could cause nasty burns. Have them help again when it’s time to package the cooled caramel corn.
Microwave to boil 3 more minutes.
Stir in the baking soda.
Pour half the mixture over each bowl of popcorn.
Now it gets a little tricky… Stir one bowl of popcorn, then put it in the microwave and cook it for 1 minute. While the first bowl is cooking, stir the second bowl. When the first bowl is done, put the second in the microwave and cook it for 1 minute, stirring the first bowl while the second is cooking.
Continue to alternate cooking/stirring bowls until each bowl has cooked 2 1/2 – 3 1/2 minutes.
Cool. I spread the caramel corn on a pan so it cools more quickly.
Put into pretty holiday containers for gifting – no wrapping required!
Microwave Caramel Corn – the Official Recipe
This recipe came from my Mom and has been a family favorite for years. I hope your family enjoys it as much as mine does!
Microwave Caramel Corn Ingredients
- 16 C popped corn, divided
- 1 C brown sugar
- 1/2 C butter
- 1/4 C light Karo syrup
- 1/2 tsp salt
- 1/2 tsp baking soda
Microwave Caramel Corn Directions
- Divide corn between 2 4qt microwave safe bowls.
- Mix brown sugar, butter, Karo syrup and salt in 2 1/2 qt microwave safe bowl.
- Microwave 2 1/2 minutes. Stir
- Bring the mixture to a boil by microwaving 30 more seconds.
- Microwave 3 minutes. The mixture should be boiling these 3 minutes.
- Remove from microwave and stir in baking soda.
- Immediately pour half the mixture over each bowl of popcorn.
- Stir the first bowl, then put in microwave and cook for 1 minute.
- While the first bowl is cooking, stir the second bowl, then put in the microwave and cook for 1 minute.
- Continue to alternate bowls; stirring one while the other is cooking, until both bowls have cooked for a total of 2 1/2 – 3 1/2 minutes. Don’t overcook or the caramel will burn.
- Cool, stirring frequently.
Let me know what you think, and who you gifted it to!

Aunt Betty’s Sausage and Apple Stuffing Recipe
My Aunt Betty makes the world’s BEST stuffing – even Cowboy says so, and he’s got a pretty discriminating palate aka: not used to eating as many different kinds of food as we are. We can’t make any other kind of stuffing now, and I’ll bet once you try it you’ll be hooked on sausage and apple stuffing too!
Sausage and Apple Stuffing – in Pictures
Cut a loaf of bread into cubes and spread on a baking sheet. Place in oven until dry and slightly toasty. We like to use a mixture of different whole wheat and whole grain breads – I think one year we added some rye bread and it was really good too.
Allow the bread cubes to cool children playing cards next to the cooling bread are optional, then place in a large bowl.
Start browning about a pound of Italian style sausage. We use turkey sausage because it’s healthier and because Princess and Angel Face don’t eat pork, but you use what you like.
Chop the celery.
Add the celery to the pan so it can cook with the sausage.
Chop the onion and add it to the pan also.
When the sausage is done and the vegetables are translucent, add chicken stock, butter, and seasonings to the pan. Bring to a simmer.
While the chicken stock is heating, chop the apples and add to the bread cubes. We like to use Cortlands because they’re my favorite, but any baking apple will do.
When the chicken stock is hot, carefully pour the mixture over the bread and apples.
>
Fold the sausage and vegetables into the bread cubes and apples, being careful not to mush the bread.
If it seems dry, add more chicken stock.
Spread in a greased 9×13″ pan, and bake.
Enjoy!
Sausage and Apple Stuffing – Official Recipe
Ingredients for Sausage and Apple Stuffing
- 2 loaves multigrain bread, cubed and dried
- 1 lb. sweet Italian turkey or pork sausage
- 2 cups sliced celery
- 1 large onion, chopped
- 2 Tbsp. poultry seasoning
- 1 tsp. dried sage
- 7 cups (or more) low-sodium chicken broth
- 2 tbsp. butter
- 2 apples, cored and chopped
- Salt and pepper to taste
Directions to Make Sausage and Apple Stuffing
- Slice bread into cubes. Place on baking sheet and bake in 350 degree oven for about 10 min, or until dry. Cool. Place cooled bread cubes in a large bowl.
- Start browning the sausage over medium-high heat. Add the celery and onion. Sauté until the sausage is cooked through and the vegetables are translucent.
- Stir in the poultry seasoning, sage, and as much chicken broth will fit. Heat to a simmer.
- While the chicken broth is heating, chop the apples and add to the bread cubes.
- When the chicken broth mixture is hot, carefully add to the apples and bread cubes. Add any of the chicken broth that didn’t fit in the pan.
- Stir. The bread cubes should be quite moist but not soggy. Add more chicken broth if needed. Season with salt and pepper.
- Place into 9×13″ baking pan and bake for about 1/2 hour, or until lightly browned on top.
Happy cooking!

Drunken Cranberries
Several years ago Teacher stumbled across a fantastic recipe for Baked Cranberries on Food Network.
Of course, in true Teacher fashion he made it better, and it’s become a must-have
at Thanksgiving every year.
Drunken Cranberries Ingredients
- 1 12 ounce bag fresh or frozen cranberries
- 1 1/4 cups sugar
- 1/4 teaspoon cinnamon
- Pinch of nutmeg
- 1/4 cup Jack Daniels
Pour the bag of cranberries in a bread loaf pan.
Add the sugar, cinnamon, and nutmeg.
Stir gently until combined.
Bake in 350 degree oven for about an hour.
Take out the cranberries and stir in the secret ingredient: 1/4 cup give or take of Jack Daniels.
Cool before serving.
Here in Wisconsin we put things on the back porch to cool – I don’t recommend that if you live in Texas though.
Enjoy!
Drunken Cranberries – Official Recipe
Adapted from Baked Cranberry Sauce on Food Network
Drunken Cranberries Ingredients
- 1 12 ounce bag fresh or frozen cranberries
- 1 1/4 cups sugar
- 1/4 teaspoon cinnamon
- Pinch of nutmeg
- 1/4 cup Jack Daniels
Drunken Cranberries Directions
Preheat the oven to 350 degrees F.
1. Combine the cranberries, sugar, cinnamon, and nutmeg in a small baking dish and cover.
2. Bake for about 55 minutes. Remove the cover and stir to melt any un-dissolved sugar.
3. Return the dish to the oven and bake for about 5 to 10 more minutes, or until the cranberries are soft and surrounded by a syrupy sauce.
4. Remove the dish from the oven and immediately stir in the bourbon, to taste.
5. Let the dish cool to room temperature, then chill for at least hour before serving. The sauce will keep for several weeks in the refrigerator.
If you’re not into Jack Daniels or the bourbon called for originally, experiment with your favorite liquor. I’ll bet Cointreau or another orange-flavored liquor would be delish.
Try them, then let me know what you think!

Easy Margarita Recipe
The very best Margarita I’ve had in my entire life was at Topolobampo in Chicago, where Teacher and I sat within spitting distance of Rick Bayless himself.
Teacher found the official Topolo Margarita recipe online for me cuz I loves Margaritas, but it’s rather labor-intensive with all of those limes to juice, and if just one of your limes is bitter it’ll mess up the whole batch.
To simplify the recipe Teacher uses limeade with a little fresh-squeezed lime juice added, and his easy Margarita recipe is just as good as the Topolo Margarita – but quicker and easier!
Easy Margarita Recipe
Be sure to choose the best quality ingredients you can find, even if they’re more expensive – it’s well worth it!
Easy Margarita Ingredients:
- 2 cups high quality limeade
- 3 fresh limes, juiced
- Extra lime wedges, if desired
- 1 cup plus 2 tablespoons white (blanco) tequila
- 1/4 cup orange liqueur
- 1 to 2 cups ice
Easy Margarita Recipe – Directions
Pour limeade into glass 4 cup measuring cup. I highly recommend springing for a not-from-concentrate limeade instead of the frozen stuff.
Add the juice from 3 fresh limes, a little at a time, until it tastes good to you. Don’t even think about using bottled lime juice. Ew.
Stir the tequila into the limeade. Don’t be cheap when shopping for Tequila; look for 100% Agave and get the best you can afford.
Then add the orange liqueur. Rick Bayless recommends Gran Torres, but we can’t always find it around here. The Patron is good, but sweeter than Gran Torres.
Add salt by rubbing the rims of your glasses with a lime wedge we use the lime halves we’d already juiced, then press the rims into a saucer of Kosher or other coarse salt.
Teacher and I like a little extra heat with our Margaritas so we rim our glasses with Chipotle Salt. Simply add about 1/2 teaspoon Chipotle powder to 1/4 cup Kosher salt and mix. Use more or less Chipotle to suit your taste.
Not only yummy, but pretty too!
Shake the margarita mixture in a large shaker or giant water bottle and pour into the prepared glasses.
Sit back and enjoy. Yum!
Official Easy Margarita Recipe
- 2 cups high quality limeade
- 3 fresh limes, juiced
- Extra lime wedges, if desired
- 1 cup plus 2 tablespoons white (blanco) tequila
- 1/4 cup orange liqueur
- 1 to 2 cups ice
- Combine the lime juice and limeade in a glass or plastic container.
- Add the tequila and orange liqueur.
- Rub the rims of your glasses with a lime wedge. Press into a dish of coarse or Chipotle salt.
- Pour the margarita mixture into a shaker. Add the with the ice and shake until chilled.
- Pour into the prepared glasses.

Pesto Cream Sauce To Die For
We don’t go to Noodles often, but when we do I almost always get the same thing: Pesto Cavatappi. It’s a little bit of Heaven in a bowl: creamy, cheesy, noodley, basil-y, carb-filled, don’t-ask-how-many-calories divineness.
Mmmmmmm…
Pesto Cream Sauce
Irish Girl found a recipe for a pesto cream sauce that’s almost as good as Noodles’, and is say it with me… is quick and easy too!
Start with the basic pesto ingredients: fresh basil, freshly grated parmesan cheese, peeled garlic, and pine nuts which you can dry-roast in a frying pan until lightly brown and delicious, but you don’t have to.
Give the the basil, cheese, garlic and pine nuts a whirl in your food processor.
Once they’re chopped up, slowly drizzle in some extra virgin olive oil, and keep whirring to form an emulsion.
Mmmmm – doesn’t that look good?! That’s all you need to do for a basic pesto, but we’re going to kick it to the next level with some cream and butter.
By the way, if you’ve got a ton of basil you can make a ginormous batch of pesto and freeze some in ice cube trays for winter.
Heat some heavy cream and butter the real stuff; no margarine allowed over medium-low heat until warm; keep an eye on it so the cream doesn’t scorch.
Once the cream and butter are warm, add the pesto and stir to combine.
That’s all there is to making pesto cream sauce – easy as pie, isn’t it?
Irish Girl stirred the sauce into some pasta she’d cooked up while she was making the sauce, but it would also be great over chicken or salmon, with crusty bread, or just off a spoon; it really is THAT good!
Irish Girl tossed in some fresh tomatoes too – the hot pasta made them all warm and yummy but not mushy. Other great additions would be cooked chicken, and sautéed mushrooms or asparagus; don’t forget extra Parmesan cheese and freshly grated black pepper on top!
Pesto Cream Sauce – Official Recipe
Ingredients:
- 1 1/2 C fresh basil
- 1 C Parmesan cheese, grated, plus extra for on top
- Heaping 1/3 C pine nuts
- 4 cloves fresh garlic, peeled
- 2/3 C extra virgin olive oil
- 1 C heavy cream
- 4 Tbsp butter
- Place basil leaves, 1 cup Parmesan, pine nuts, and salt and pepper to taste in a food processor or blender.
- Turn machine on to chop ingredients. Leaving machine on, slowly drizzle in olive oil and continue mixing until combined. Add additional olive oil if the mixture seems dry or pasty. Set aside.
- Heat cream and butter over medium-low heat. When warm add pesto and stir.
- Pour pesto cream sauce over prepared food and serve immediately.
Enjoy!
Healthy Spinach Pasta Salad Recipe
During the summer Teacher and I try to eat both lighter and healthier, so salads are a natural choice. The kids aren’t as thrilled about it, but we try to find salads with ingredients that they’ll like. College Boy calls salad “Rabbit Food” although he will eat a polite amount… then order pizza later in the evening!
This spinach pasta salad is not only healthy, but has something in it that everyone in our family will eat – always a plus!
Healthy Spinach Pasta Salad
This is a super-easy recipe: all you need is spinach, tomatoes, fresh mozzarella cheese, and pasta. You can use your own Italian dressing, or make one “from scratch” like we did.
We were cooking for all 11 of us, so you’ll probably want to cut down the amounts. Cook up a package of pasta according to the directions. I wanted to use whole grain pasta, but knew the kids wouldn’t eat it so we used organic “white” pasta instead. After draining, rinse the pasta in cold water to stop it from cooking. Drain well and place into a large bowl or 9×13 pan to mix the ingredients.
Rinse about 2 pints of tomatoes and drain. It was early in the season so we used grape tomatoes, but once they’re available I’ll use yellow pear, yellow, orange or heirloom cherry, or any other type of tomato that catches my eye at the farmer’s market. If I’m lucky I may even get enough tomatoes from our garden to use in the salad!
Cube 4 – 6 ounces of fresh mozzarella cheese and add to the pasta and tomatoes.
Mix well. You can add the spinach now, but because it’s so big and flat it never seems to mix well with the pasta and tomatoes. I prefer to lay down a bed of spinach and spoon the pasta mixture on top.
Use your favorite Italian dressing I’m partial to Paul Newman’s Tuscan Italian, or whisk together:
- 1/4 C red wine vinegar
- 2 Tbsp chopped fresh curly or flat-leaf parsley
- 1 Tbsp fresh oregano leaves
- 2 Tbsp extra-virgin olive oil
- 2 cloves garlic, minced
- Salt and pepper to taste
Some people mix the dressing right into the salad, but we’ve learned that our picky eaters will do much better if we keep several components separate and let them put together their own salad.
Doesn’t that look yummy – and healthy?!
Like most of my favorite recipes, this one can be personalized any way you want. You could use another shape of pasta, a different cheese, substitute other veggies, add fresh herbs basil or oregano would be nice – or whatever else you like!
Happy – and healthy – eating!

Oreo Cheesecake Cupcake Recipe
Irish Girl has a fattening habit of making dessert on the nights she makes supper. One day she made Oreo Cheesecake Cupcakes – she had to make them in the early afternoon so they’d have time to chill. Z-Man started out helping but was quickly bored so I handed over my camera and photo-taking responsibility. He didn’t do half-bad!
Oreo Cheesecake Cupcake Recipe
Photography by Z-Man.
Start by lining cupcake pans with foil cupcake liners, or use silicone cupcake liners that stand up by themselves so you can cover a cookie sheet with them.
Once your liners are ready, place a whole, unbroken Oreo in the bottom of each one. Wait! I know you want to eat the broken Oreos, but be sure to save some for inside the cheesecakes too!
Make sure your cream cheese is room temperature, then beat it with an electric mixer until it’s smooth.
Gradually beat in the sugar, making sure it’s well-combined and scraping down the sides of the bowl as needed. Then beat in the vanilla.
Did you notice the really cool Black & Decker mixer Irish Girl is using? It was my Christmas gift from Teacher’s parents, but Irish Girl and Princess have used it WAY more than I have. Not that I’m complaining; there’s sweets in the house that I didn’t have to make!
Crack the eggs into a separate bowl and lightly beat them together. Drizzle the eggs slowly into the cream cheese mixture, beating them in fully and continuing to scrape the sides of the bowl as needed.
Beat in the sour cream and salt, and keep scraping the sides of the bowl.
Coarsely chop the remaining Oreos assuming you listened to me and didn’t eat them all and stir them into the batter by hand.
Divide the batter among the cupcake liners; filling them almost all the way to the top.
Bake at 275 degrees for 22 minutes, or until set; rotating the pan halfway through baking time. They’ll look really soft but will set up as they cool.
Chill at least 4 hours before serving.
Yup, I said 4 hours kiddo; you’ve got a loooong time to wait.
If you used liners in cupcake pans, leave the oreo cheesecake cupcakes in the pans until you’re ready to eat them.
Mmmmm – don’t they look good?!
And not fattening at all, right? Please say yes!
Hey girls, want an Oreo Cheesecake Cupcake?
Nope, not until after Backyardigans.
But Little Guy will take one now – yum.
He likes it – hey Mikey Little Guy!
Oreo Cheesecake Cupcake Recipe
From Martha Stewart’s Cupcakes
Ingredients:
- 42 Oreos, or similar cream-filled sandwich cookies; 30 whole and 12 coarsely chopped
- 2 lbs cream cheese; room temperature
- 1 C sugar
- 1 tsp vanilla
- 4 large eggs; room temperature and lightly beaten
- 1 C sour cream
- Pinch of salt
1. Preheat oven to 275 degrees. Line standard muffin tins with paper or a cookie sheet with silicone liners. Place one whole cookie in the bottom of each cup.
2. With an electric mixer on medium-high speed beat cream cheese until smooth, scraping down sides of bowl as needed. Gradually beat in sugar until well-combined. Beat in vanilla.
3. Drizzle eggs in slowly; beating to combine and scraping sides of bowl. Beat in sour cream and salt. Stir in chopped cookies by hand.
4. Divide batter evenly among cookie-lined cups; filling each almost to the top. Bake, rotating pan halfway through, until set; about 22 minutes. Transfer to wire racks to cool completely. Refrigerate at least 4 hours (up to overnight) before serving. Remove from tins right before serving.
I hope you try these Oreo Cheesecake Cupcakes, and if you do, be sure to drop me a line to tell me what you thought of them!
Happy Cooking and Eating!

Bourbon Chicken a la College Boy
As I’ve said before, one of the benefits of having College Boy, Irish Girl and Love Bug live with us besides getting to know Irish Girl and Love Bug better is trying out some of their favorite recipes. Recently College Boy made Bourbon Chicken and it was a definite home run; even Z-Man and Little Guy liked it!
Bourbon Chicken Recipe – a la College Boy
Irish Girl likes to try recipes she finds online. This Bourbon Chicken recipe came from Heather Drive; one of her favorite blogs. Not only is it quick and easy you know that’s how I like to cook but it’s fairly healthy too – bonus!
This week it was College Boy’s turn to cook. Since I grew up with a dad whose mode of cooking was a run to “Whopper Burger” aka Burger King I love the fact that College Boy cooks for his family.
College Boy cut boneless skinless chicken breast into bite-sized pieces and browned them, then took the chicken out of the pan and set it aside.
Next he made the sauce by whisking together crushed garlic, powdered ginger, crushed red pepper flakes, apple juice, brown sugar, ketchup, cider vinegar, soy sauce, and water in the same pan he used for the chicken.
Once the ingredients were thoroughly mixed he put the chicken back in and let it all simmer for about 15 minutes. Then he added frozen broccoli, let that cook about 5 minutes, then it was done.
See – quick and easy!
While the sauce was simmering College Boy made Minute Rice. If you’re using regular rice you’ll want to start it much earlier – like when you start the chicken.
Serve the Bourbon Chicken over a bed of rice, and don’t forget to spoon extra sauce over the top. Yum!
It was a little bit sweeter than I’d like, so next time I’d use less brown sugar, but all of the kids loved it just the way it was. In fact, they ate so much that there were hardly any leftovers; can’t complain about that now, can I?
Bourbon Chicken Recipe
Ingredients:
- 1 lb. boneless chicken breasts, cut into bite size pieces
- 1 Tbsp olive oil
- 1 garlic clove, crushed
- 1/4 tsp grated fresh ginger (powdered if you don’t have fresh)
- 1/4 tsp – 3/4 tsp crushed red pepper flakes (we used 1/4 tsp so the kids would eat it)
- 1/4 C apple cider
- 1/3 C brown sugar
- 2 Tbsp ketchup
- 1 Tbsp apple cider vinegar
- 1/2 C water
- 1/3 C low-sodium soy sauce
- 1 head broccoli, cut into florets and steamed (or 1 pkg frozen broccoli florets)
Directions:
- Heat olive oil in large pan over medium-high heat. Add chicken and brown lightly, then remove to a clean bowl.
- Reduce heat to medium, then using the same pan combine remaining ingredients except broccoli and whisk until well combined.
- When mixture comes to a boil add the chicken and reduce heat. Simmer 15 minutes, then stir in cooked broccoli to cover with sauce, and simmer another 5 minutes to warm broccoli.
- Serve over a bed of rice. Enjoy!
Bourbon Chicken Recipe Variations
You can easily personalize this recipe to fit you family’s preferences. Here are a couple of our favorite variations:
- College Boy’s Version: Use twice as much chicken and omit all vegetables.
- Irish Girl’s Version: Substitute peas for broccoli, or use both to get twice as many veggies in your vegephobic husband. I made the vegephobic part up, but like it enough to use it again.
- My Version: Cut the amount of brown sugar in half and add a splash of sherry or bourbon to the sauce.
Let me know what your family thinks of Bourbon Chicken when you make it, and if you have your own variation.
Happy cooking!


