Another Easy Photo Ornament Gift Idea
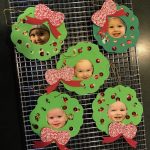
Every year I have the child care kiddos make Christmas gifts for their parents, usually something “big” and a photo ornament. One year the photo ornaments were based on blank wood cut-outs but this time I went even simpler and started with a craft foam kit. True confession: I don’t…