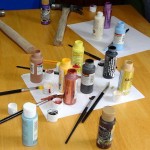
It’s Nicole’s Fault
This stack of gorgeousness is all Nicole’s fault.
Really and truly!
OK, to be honest, she did have some help from Dorothy and Ikea.
But it’s mostly her fault.
Here’s what happened…
I’d heard about Ikea before, but since we don’t have an Ikea store near us I didn’t think about it much until I needed to get a new high chair for Peanut.
That wasn’t Nicole’s fault – her part comes later.
I knew exactly what I wanted, and an extensive search led me to Ikea. I ordered the high chair, it arrived and I love it, but I didn’t think about Ikea again, until the dishes thing.
We’re getting to the part where it’s Nicole’s fault.
Several years ago I’d bought three sets of smaller Tupperware plates I think they were salad or dessert plates and I loved them, but they only came pink, orange, green and blue. I like to have each child always use the same color of plate, cup, and bowl so there’s no fussing about who gets what color at mealtimes, but the plate colors didn’t match the colors of the Tupperware cups I already had.
I know, I know – it’s a small thing, but it really bugged me!
Another problem was that the Tupperware bowls were waaaaay too big for children’s portion sizes. I’ve been attending workshops on the prevention of childhood obesity and portion size is important, so I’ve started keeping a closer eye on the children’s portion sizes.
The kids didn’t seem to appreciate my concern for their health. I’d dish out their 1/4 cup of oatmeal – the minimum portion for a two year old – and they’d look at their bowl, then at me. I could hear them thinking “Seriously – that’s all I get?” Of course they were offered seconds and sometimes thirds, but the bowls were just so big it made their servings look miniscule.
I decided to get new dishes, but didn’t know where to look.
This is where it’s Nicole’s fault.
Nicole took a weekend trip to the Chicago area to visit friends and go to Ikea. She came back raving about all the cool stuff Ikea had; especially the children’s dishes. She knew I was looking for smaller bowls, different colors, and cheap; Ikea had smaller bowls, in sets of six different colors, for just $1.99 per set.
What a deal!
Teacher and I love Chicago and would love to take the kids there for a weekend, but when? With all the activities our family has going on we wouldn’t recognize a free weekend if it came up and bit us on the nose.
With my usual impatience I wanted the dishes NOW, but consoled myself with the thought that maybe over the summer we could take a day trip to Chicago. In the meantime I filed “Ikea Dishes” away under “Things to Do Someday When There’s Time” – cross-referenced with “Keep an Eye Out for Anyone Going to Ikea.”
It’s still Nicole’s fault…
Our friend Dorothy decided to take a road trip to Ikea to look at some shelves, and when Nicole found out about the trip she told me right away. We both asked Dorothy to pick up some things for us: cups for Nicole and obviously dishes for me.
As excited as I was, Z-Man, Little Guy and Peanut were even more excited when I brought them home. They dug right in and started ripping open the plastic packaging. There were plates, bowls and cups flying everywhere!
Before all the packages were opened Z-Man started sorting by color; setting aside all the dishes in his favorite color: orange.
Little Guy did the same, except he grabbed the green ones.
Even little Peanut got into the act, looking for all the pink ones.
I guess I know what colors are taken.
Aren’t they pretty? I love the bright colors, and the size is perfect for children. I only wish I’d gotten the matching plastic forks, spoons and knives. They would have been just adorable!
Guess we’ll need to take a summer day trip to Chicago anyway.
And it was all Nicole’s fault.
Thanks Nicole!

It’s Easy to Apply Vinyl Lettering!
It’s easier than you can imagine to apply vinyl lettering, and to prove it I took pictures of the very first time I ever applied vinyl lettering in my whole life!
But first, a little background…
This is my friend Carie who in addition to being beautiful is an Uppercase Living demonstrator. She introduced me to the wonderful world of vinyl lettering. To be honest, I’ve been aware of vinyl letting for a while, but thought it was tacky until I saw some “up close and personal” at her house.
I became obsessed with the idea of putting “Welcome” on the child care entrance aka our back door to greet the children and their parents.
I’ve dabbled in graphics for a couple of years and have collected more fonts than I can name, so at first I thought I’d find a pretty font and paint “Welcome” on the door myself. Then I realized that the brush strokes would probably still be visible under a new coat of paint if we ever decided to paint over it.
Not to mention that’s a lot of work, and I’m more about quick and easy.
Shortly afterward I discovered that Uppercase Living was offering a free holiday greeting with every purchase. Two for the price of one and much less work? I couldn’t resist!
When the “expressions” as the Uppercase Living catalog calls it arrived I began to worry about applying the vinyl lettering. Even though I’d measured the door and Carie showed me how to do it I was afraid of messing it up.
I read the directions four times, then gathered supplies: tape, scissors, the “scraper” that came with my order, and the vinyl lettering, of course.
First you’re supposed to rub both sides of the vinyl lettering with the scraper tool or a credit card, to help the lettering come off the paper.
Next you have to determine placement and take the backing off.
There are two ways to do this: slowly and carefully pull the backing off at a 45 degree angle, or use the “hinge” method.
Determining placement was actually the hardest step for me, because the whole thing with paper attached was bigger than the part of the door where I wanted to put it. Since I’m a dork and didn’t want to write on the just-painted-last-summer door I used Post-It notes to mark the centers.
After re-reading this section again I decided to try the “hinge” method because it seemed more fool-proof. Once you’ve determined placement, tape the expression in place along the top; keeping all the layers in place.
Once your vinyl lettering is securely taped in place, carefully flip the whole thing up and beginning at a corner, slowly peel the backing off at a 45 degree angle.
This is where I got into trouble – my tape “hinges” didn’t have much door to hold on to so they let go as I peeled the backing off. It finally came all the way off the door and I ended up holding the sticky top layer with lettering attached, terrified that it would fold over onto itself and fuse together into a gummy mess.
Eyeballing it as best I could, I carefully centered the expression, then smoothed the lettering and sticky paper onto the door with my fingers. I ended up with some wrinkles and bubbles in the top layer but didn’t worry about them as long as the lettering was smooth.
Next, use the scraper to rub the letters onto your surface so they’ll stick when you peel the top layer of paper off. Make sure you get all the edges and corners!
Again beginning at a corner and working at a 45 degree angle, slowly peel the top layer away from the vinyl lettering. If any of the lettering sticks to the top layer simply smooth the top layer back, rub with the scraper, and try again.
I learned that the tops of all the letters had to be rubbed down REALLY hard or they wouldn’t stick to the door.
Almost done!
Now for the test… because of the doorknob I wasn’t worried if my “Welcome” wasn’t perfectly centered side-to-side, but I certainly didn’t want it slanting up or down!
One inch below the first “e” …
One inch below the second “e” – I did it! Even eyeballing it I got it straight.
Whew!
Ta-da! Isn’t it pretty?
I especially love how it fits perfectly inside the screen door – it’s almost like a frame.
See, I promised that it’s easy to apply vinyl lettering!
Do you have any vinyl lettering in your house, or are you planning to get some? I still want some along the soffit in my kitchen, but haven’t decided what I want it to say yet… got any ideas?

One Little, Two Little, NO Little Indians
I try very hard to offer an anti-bias child care program but I know I still miss the mark sometimes. Some habits are so ingrained in me that I don’t even notice them until someone points them out. It’s like those “Claritin Clear” commercials – you think you’re seeing clearly until they lift the film and all the colors get brighter and clearer. We think we’re doing a good job being culturally sensitive until the film is pulled back and we see something we’d always taken for granted in a new light.
I had my personal film pulled back in one of the workshops I went to at the WECA conference – “I is not for ‘Indian’.”
I’ve known for a long time that certain things should be avoided, like using the term “Indian” to describe Native Americans, the song “One Little, Two, Little, Three Little Indians,” saying “Indian Corn” instead of “maize,” using the term “Indian giver,” and sitting “Indian style” instead of “pretzel legs.”
I also knew that “Cowboys and Indians” was a big no-no, but at the workshop I learned a new reason why: “Cowboys and Indians” isn’t just a game where one military goes against another; it’s an occupation (cowboys) vs a whole people (Native Americans). It would be like playing “Cowboys vs Blacks” or “Cowboys vs Women” – can you imagine the outrage if children were playing either of those games?
At the workshop I also learned the best way to handle the “First Thanksgiving” – something I’ve struggled with for a long time. On the one hand I’ve felt that I should talk about the friendship between the “Pilgrims and Indians” with the children, but on the other hand I knew that the traditional “Pilgrims and Indians” that I grew up with and that are still present in many schools is wrong.
I learned that the best way to handle the “First Thanksgiving” is to not go there.
Just skip the whole “First Thanksgiving with the Pilgrims and Indians” thing, and focus on the things we’re thankful for in our lives. Things like our mommys, daddys, brothers, sisters, friends, pets, yummy food, favorite toys, etc.
Skip the stereotypical pilgrim and Indians, and decorate with turkeys and cornucopias like these great floral ones instead. Replace the paper bag “Indian vest” craft with paper bag turkeys or paper bag pumpkins.
It makes a lot of sense when you stop to think about it; most of us celebrate Halloween and Valentine’s Day very happily without a history lesson about the “First Halloween” or “First Valentine’s Day” don’t we?
If you feel the need to address the First Thanksgiving, or are wondering how to accurately reflect Native American culture, check out www.Oyate.com. There’s a whole page of Thanksgiving resources, plus books to order and criteria for evaluating books you may already own.
Sorry Maurice Sendak, as much as I love you, “Imitating Indians” is not what I want my children to think Native American culture is!
I want my children – and the children I care for – to learn about the wonderfully rich, complex, and diverse culture of real Native American tribes.
Now where did I put those brown paper bags?

12 Random Photos from the 2010 WECA Conference
Last week I posted how excared and nercited I was about the upcoming WECA Annual Conference in Madison. Silly me, to waste good worrying about nothing; our workshop went great and the rest of the conference was fun too!
Here are 12 random photos from the conference for your amusement and enjoyment:
One of the best things about the conference is that we spend most of the weekend laughing. The outfit will be explained later…
The hotel only had paper cups so we mixed our drinks in the cups we’d brought for our workshop. Snap the photo already; I’m cold and want to get in the hot tub!
Friday morning Nicole called home before our workshop to make sure her kids were all ready for school. Her six year old wanted to wear a sundress without a sweater, but Nicole straightened her out.
Yes, those are Starbucks cups on the table – thanks Dorothy! When Dorothy is around I know I’ll always have a coffee buddy; she’s more addicted to coffee than I am!
Until this year WECA has held a silent auction of donated items, and Valley AEYC puts together a donation. This year WECA decided to hold a raffle instead, and our donation was this back pack stuffed with school supplies. I’m kind of bummed that they had a raffle instead of the silent auction; I would’ve liked to know how much someone thought the back pack full of stuff was worth.
After Friday’s keynote address I quick snapped a photo of some Valley AEYC members. From left to right are: our current vice president; our previous vice president; our current treasurer; and a future board member. Although she doesn’t know it yet, bwa-ha-ha!
Here are my two favorite puppeteers extraordinaire. One is the daughter of my high school Communications teacher and the other’s name I misspelled way too many times – sorry, Mickey! Our past president, a member who works with the previous three, and the third member of the inseparable Cassie/Mickey/Becca triumvirate.
Friday’s luncheon was disappointing: wilted salad, hard roll, not-so-bad smashed potatoes, and tough and tasteless pork. The only item worth the price we paid was this chocolate cake; it was To Die For! The cake layers were moist, dense and rich, while the ganache filling was rich in a fudgy but not heavy way, creamy and just melted on your tongue. It was the most incredibly wonderful chocolate cake I’ve had in my entire life!
After lunch I attended a workshop by two of my favorite presenters: Billie and Kelly. Their workshops are always thought-provoking, informative, and full of giggles!
One of the things I always look forward to is the vendors. The Exhibitor’s Hall is always packed with booths full of wonderful things to look at, try, and buy. Many of the vendors have chocolates sprinkles on their tables, and give away “freebies” or sample with their info packs.
The maker of these gorgeous safety gates, Gatekeepers, caught my attention. I grabbed a brochure and took photos in case one of our wooden gates needs to be replaced some day.
Nicole and Julia who presented at the Valley AEYC mini-conference put together an operatic opening to the raffle drawings. Nicole lip synced on a chair while Julia stood behind her, singing. It was hilarious, and a great ending to the afternoon.
Next year the WECA Conference will be here in town and Valley AEYC will help plan it. I can’t wait!

I’m so Excared! I mean Nercited, I mean…

I’m both excited and scared/nervous about the Wisconsin Early Childhood Association’s (WECA) 56th Annual Conference in Madison this weekend.
My friend Nicole owner and operator of Impressions Family Child Care and I are presenting a workshop together, titled “The Three R’s of Mealtime.” It’s not the first time we’ve presented a workshop together, not the first time we’ve presented this particular workshop, and not the first time I’ve presented a workshop at WECA, but I’m still nervous.
My biggest fear whenever I present a workshop is timing. I don’t know which would be worse: running out of material too early and having a roomful of early childhood educators staring at me as I try to think of something else to say, or running out of time and not being able to finish the presentation.
My second biggest fear is that someone will ask a difficult question or give us a hard time. The keynote presenter at our Valley AEYC Mini-Conference had to field some difficult questions and did it with finesse, but I’m not her.
My third biggest fear is forgetting to pack something. What if I forgot something for the workshop, my make-up, extra pants, or my UNDERWEAR?! I suppose forgetting something wouldn’t be the end of the world; one year Nicole left her entire suitcase at home and she managed to survive until the next day when Teacher brought it to her when he picked me up from the conference early. Hope you don’t mind me telling the story, Nicole!
On the other hand, I’m jumping-up-and-down excited about going to the conference! I’ve gone every year for the past 10 years except the years Z-Man and Little Guy were nursing and always have a great time. Not only is it fun to “get away from it all” for a while, it’s inspiring to be surrounded by hundreds of other early childhood professionals.
Every year I come home with at least one idea I want to incorporate into my child care program, and usually find some cool toys or supplies too. Last year I won K’nex Grover in the Silent Auction. Isn’t he the coolest?!
Now all I need to do is finish packing…

Early Childhood Conference 2010
I attended my first Valley AEYC Mini-Conference in 2000. I ejoyed it so much I offered to help plan the next one, and have been co-chair of the conference since.
This year our theme was “Creating the Future,” which was a really fun theme to plan.
The day started on a positive note – Dorothy, the director of director of Young Child Development Center brought Starbucks for the committee members.
Usually we put a committee member in charge of the food but this year Nicole – the other co-chair – decided to do it herself.
We covered the tables with rolls of paper and put out colored pencils so conference attendees could doodle during the sessions.
One of our goals is to have enough door prizes so one in four attendees wins something and we try to have most of the door prizes fit the theme.
This year it was so easy to find things to fit the theme we had to rein ourselves in so we wouldn’t go over budget.
The “grand prize” was free registration for one day at the statewide conference – worth over $100!
Usually we have one keynote presentation in the middle of the conference and several workshop choices scheduled before and after, but this year we decided to do something different. We were fortunate to have Julia, the president of the Wisconsin Early Childhood Association, as our keynote speaker, and she was gracious enough do two keynote presentations for us which filled the entire morning.
Julia’s first presentation was about process art vs product art. Books have been written about the subject but to explain it briefly, process art emphasizes the creative process over the finished product while product art expects a certain result. For instance, finger painting is process art – unless you ask the child to paint something specific. The easy way to tell the difference is to ask yourself if there was a specific end result – if there is you’ve got product art but if not you’ve got process art.
Sorry, I’m passionate about process art and tend to get carried away…
During part of her workshop we each had paint and a different tool to create with.
Julia encouraged us to “paint like a child” without an end result in mind.
Everyone got right to work and started creating.
Some attendees got into the painting – literally!
Even though the emphasis was on the creative process, the end product was beautiful too.


Julia’s second workshop was an overview of the new YoungStar quality rating program. I haven’t decided if I’m going to participate in the program or not; it’s only mandatory for centers serving children who receive tuition assistance from the state. I’ve got several months yet before I have to decide so I’ll continue to do research on the pros and cons.
The mini-conference officially ends at noon, but we offer an optional afternoon session for people who want to stay and get an additional hour of continuing education.
One of the afternoon options was “Customer Service in Child Care” by the director of 4Kids Childcare and Learning Center. He did a great job making a rather dry subject interesting, and applying it to our everyday lives at work.
The other afternoon option was “Puppetry and Literature” by Hands 2 Grow.
They are a lot of fun and VERY creative – they see puppets in everything around them.
I couldn’t believe how quickly the day went by; before I knew it, the conference was over!
I think everyone had a good time and hopefully took at least one idea home with them.

Nekkie Bottom Girl
When you work with kids you can bet on a steady diet of laughs and surprises.
If you’re lucky you’ll get both at the same time.
The other day I got lucky – the girls surprised me and made me laugh so hard I cried.
I went to the bathroom for a moment when you’re the only adult in a houseful of kids you learn to pee quickly and came out to see Peanut toddling Frankenstein-style through the dining room, her bottom half totally nekkid.
Huh?
I did a classic double-take and stood frozen with surprise; up to now Peanut hadn’t shown any interest in taking her clothes off so this was the last thing I expected to see.
As my brain was wrapping itself around the puzzle of how and why Peanut was half-nekkie G came toddling through the dining room as fast as her chubby legs would go, waving Peanut’s diaper over her head and babbling at the top of her lungs. Luckily the diaper was just damp and not poo-ey; that would have been a catastrophe! I could just imagine what she was trying to say:
“Wait! You forgot something! Hey! Come back – I’ve got your diaper!”
Peanut just kept on truckin’ and didn’t look back.
I cracked up laughing and reached for my camera but by the time I had it they were both long gone.
After I retrieved the diaper from G, I scooped up Peanut and took her to the changing table. As I was putting a new diaper on her G returned with a twinkle in her blue eyes and a big grin on her face, waving Peanuts pants over her head. She seemed very proud of herself but I’m not sure if it was because she found Peanut’s discarded clothing or because she was the one to disrobe Peanut in the first place.
I’d lay odds that it was a joint effort.
Who would’a thunk that in just a few months these two cuties would be such troublemakers?
Family child care – never a dull moment.

Meet me at Pullman’s
Every year the Valley AEYC hosts an Annual Award Dinner to vote for new Board members and celebrate the members’ active participation; members who attend five events and help out in some way receive $10 toward their dinner. In addition to elections there’s also a business meeting, but its mainly a night to have fun hanging out with other early childhood professionals.
This year the Dinner was held at Pullman’s, a restaurant I’d never been to before. Pullman’s ison the river almost directly underneath the Oneida Street bridge and has gorgeous views of the river. Since this year’s dinner theme was “Transportation” Pullman’s was a perfect choice.
We had a giant room to ourselves, which is good because sometimes often we get loud and silly; something that’s great for working with kids but tends to annoy other diners. At one end of the room was a table with name tags, door prizes, and an adorable airplane to put the door prize slips in.
As usual, the Dinner Committe did a wonderful job with table decorations; at each place setting was a pen, luggage tag, and potted plant. I’m not sure how potted plants fit into the theme, but they sure were pretty. I had a red one by my place but another member traded me for a purple one cuz purple is my favorite color.
We had a smaller group than usual this year but that doesn’t mean we had less fun; it just means we all get a door prize! Hey, whose margarita is that? It looks yummy; I think I need one on the rocks.
A is ready to get this party started but N and M are talking business – exchanging Father’s Day gift ideas. One of the things I look forward to at each of our monthly meetings is sharing ideas with other early childhood teachers.
Two of the Dinner Committee members are getting ready to hand out more door prizes. Pick me, pick me!
No, they didn’t pick me. They picked our out-going Vice-President instead. There must be something funny inside cuz J is totally cracking up.
C is the lucky winner of the suitcase, and was absolutely thrilled. Congratulations C – now you’ll have to plan a vacation!
Every May we elect either President and Secretary or Vice-President and Treasurer. This year V.P and Treasurer were up for grabs, and were won by these two ladies. Congratulations, I’m looking forward to working with you! I’m currently serving as Secretary again; I served two two-year terms several years ago.
That was the short story of our night: good food, good company, good prizes… and a good time was had by all.

Mother’s Day Flower Pot Craft
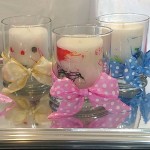
Spoiler alert!
If you’re the mother of a child enrolled in my child care program you may want to skip this for now and come back after you open your Mother’s Day gift. I’m just sayin’…
Everyone else feel free to keep reading for a fantastic Mother’s Day craft idea.
Mother’s Day is just around the corner, and if you’re a procrastinator like me you haven’t thought much about it yet. This year I found a quick and easy project that you and your child can do in under two hours – and it’s cheap money-saving too!
Mother’s Day Flower Pot Craft Supplies
You don’t need many supplies for this craft project, just:
- A small terra cotta flower pot. Ours were about 3.5″ diameter.
- Acrylic paint. We used metallic gold leftover from another project.
- A regular household sponge. I took cut it into fourths for easier handling.
- Clear acrylic sealer.
- Potpourri.
- Tulle or tissue paper and ribbon, gift wrap or gift bags, etc for wrapping. I used leftover tulle from Princess’s veil and ribbon from her wedding flowers, but you can use whatever you like.
Directions for the Quick and Easy Mother’s Day Flower Pot Craft
This project is so quick and easy it’ll probably take me longer to type the directions than it’ll take your child to do.
1. Prepare:
Make sure your child is wearing something you don’t mind getting paint on. Acrylics stain and kids manage to get full of paint no matter how closely you watch them.
Pour some paint into a shallow container – I use old peanut butter jar lids or the tops to YoCrunch yogurt containers.
2. Paint:
Show your child how to dip the sponge into the paint and dab it on the flower pot.
Young children will need close supervision so they don’t try to taste the paint, and may lose interest before the pot is fully painted. This is OK! Celebrate your child’s self-expression and refrain from finishing it for them.
Older children can put their hands inside the flower pot to turn it, and will be more likely to paint designs or cover their pot entirely with the paint.
This is sixteen month old Peanut’s flower pot. She painted it almost all by herself; she just needed a little guidance to put the paint on the pot instead of in her hair.
This is five year old Z-Man’s pot. He covered the entire thing with paint, including the top rim.
3. Seal:
Allow the flower pots to dry according to the directions for your particular brand of paint.
When the pots are thoroughly dry take them outside and spray them with the clear sealer. Let dry.
4. Have your child fill the pot with potpourri. To make it easier for the younger ones I poured the potpourri into a large bowl, and they all enjoyed picking through the potpourri for specific pieces that appealed to them. Be sure to have your child wash his/her hands afterward.
G loved painting her pot and filling it with potpourri. I think she would have played in the potpourri for an hour if I’d let her.
This was C’s first week in care and first time painting with us. He wasn’t so sure the painting thing but sure got into filling it with potpourri!
Little Guy dug through the bowl to find all the green pieces – green is his favorite color of course. He even picked out a green outfit that day.
5. Wrap:
Finally, wrap the pot. If you’re using tulle or tissue paper cut a large square with a pinking shears that’s the one that makes zig-zag cuts and stand the pot in the center. Bring opposite corners up to meet above the center of the pot and gather them together right above the potpourri. Wrap a pretty ribbon around, tie a bow, and you’re done!
Mother’s Day Flower Pot Craft Variations
Feel free to put your own spin on the project! Here are some ideas to get you started:
- Give a school-age child paintbrushes and several colors of acrylic paint to let them really express themselves.
- Replace the potpourri with Hershey Kisses or other small chocolates, decorative stones or marbles, dirt and a real flower, or pretty much anything you can think of that will fit.
- Instead of paint have your child put stickers or sticky-back fun foam shapes on the flower pot.
Enjoy making this Mother’s Day flower pot craft with your child – and be sure to send me a photo when you’re done. PS- It’s perfectly legit to have your child make one for you!

Three Free Diversity Activities
I used to think that promoting diversity in my childcare program meant having picture books with children from other countries in traditional dress, or serving Cinco de Mayo tacos on May 15.
Was I ever wrong!
True diversity is more than the color of your skin, where your ancestors came from, or whether you’re a boy or a girl. True diversity is what makes you different from everyone else – even members of your own family.
It’s easier than you’d think to celebrate diversity, and to prove it I have several super-simple and free diversity activities you can do at home with your own children.
Free Diversity Activity #1: How Now, Brown Cow
Quick – what color is a cow? A pig? A chicken? If you said cows are black and white, pigs are pink and chickens are white, you’re only partially right. And you didn’t read the title of this activity – the rhyme is How Now, Brown Cow, see?
Sure, cows are black and white, but they’re also white, brown, black, red, white and brown, white and red, etc. They also come with short horns, long horns and no horns. With spots and without spots. Hey, I live in Wisconsin, I know cows. Pigs and chickens come in all different colors, with and without spots too. So where does the free diversity activity come in?
Next time you’re shopping for farm animals, bypass the stereotypical black and white cows, pink pigs and white chickens. Instead, look for toy animals in all the beautiful colors and variety that nature provides. Then take a moment with your child to talk about all those difference, and how none is better than another – just different. If your child is really getting into talking about the differences in animals, you can talk about the differences in people. Discuss how people can be the same: two legs, two arms, one head, and how they can be different: eye color, age, favorite foods, talents. Be sure to point out that one isn’t better than another, and different isn’t bad, it’s just… different.
Wasn’t that easy? Ready for another super-simple free diversity activity?
Free Diversity Activity #2: Beans, Beans, the Musical Fruit
For this activity you’ll need a container I use an under-bed sized plastic container, but you could use a smaller one and dried beans – lots and lots of dry beans. Buy enough beans in a variety of colors, shapes and sizes to fill the container about half-way. Do NOT use red kidney beans because they contain a toxic substance that can cause serious illness if as few as 4-5 raw beans are ingested.
This has got to be the simplest diversity activity on the planet. Pour the beans into the container and give your child scoops, spoons, funnels, and other implements to use with the beans. How simple is that?! You child will experience diversity just by playing with the wide variety of beans you’ve provided.
To extend the diversity activity you could name each type of bean, compare their colors, sizes, patterns and textures with your child. You could also have your child sort the beans into a clean egg carton or ice cube tray by color, size or other characteristic.
For a parallel cooking activity don’t put all the beans into the container and use these to make bean soup with your child. A related musical activity would be to teach “Beans, beans, the musical fruit…” to your child, but I’ll leave that up to your discretion.
Free Diversity Activity #3: Dishes and Other Kitchen Items
We’ve all seen them – those adorable play dishes sets with the matching plates, matching bowls, matching cups, matching forks and spoons… I had a set when I was a kid. But wait – where’s the diversity when everything matches?
There isn’t any, that’s the problem.
It’s easy to add variety to your child’s play kitchen! Visit your local thrift shop and look for wooden or metal dishes, small baskets, plastic, wood and metal utensils, etc. Instead of miniature sizes search for “real-life” sized dishes in sturdy materials so your child can experience materials beyond the technicolor plastic most items for children are made of. While you’re at it why not look for placemats or tablecloths in fabrics from other cultures, and silk flowers or plants for your child to use as centerpieces?
To bring diversity to your family dinner table pick up a couple of pretty single pieces of china. Large bowls and plates make beautiful – if not matching – serving platters and dishes.
By the way, boys need access to kitchen supplies that they can play with too, so be sure to provide some for your child, even if he’s a boy. Besides, if you encourage a love of cooking in your son now your future daughter-in-law will adore you later!
And remember, you know your child and what will be safe for him/her better than I do. Please use common sense and check all items for safety before giving them to your child. Dry beans are a choking hazard for small children so don’t introduce bean play until your child is ready, and be sure to monitor your child while he/she is playing with the beans.
I hope you enjoyed these free diversity activities. Promoting diversity is important to me, so watch for more free diversity activities in the future.
Thanks for being part of my life!

Share these Three Free Diversity Activities
If you feel that this article has been helpful to you and that it may also be useful to others, please consider sharing it through Facebook, Twitter, or linking to it as a resource on your website or blog!
Link to Three Free Diversity Activities
Title: Three Free Diversity Activities
http://www.myhappycrazylife.com/free-diversity-activities


